Compressing a brake piston is an essential step in changing your vehicle’s brake pads or servicing the braking system. The brake piston must be compressed to create enough space to install new pads. You might be wondering how to compress brake piston. Auto body is one thing, but having your piston working is another. Although the process is relatively straightforward, it requires careful attention and the right tools to ensure it’s done safely and efficiently. This article will guide you through the necessary steps for compressing a brake piston, explain the tools you will need, and provide some tips for a smooth brake service.

Understanding Brake Pistons
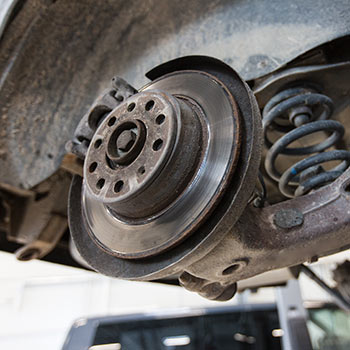
Before diving into the process of compressing a brake piston, it’s helpful to understand the role of the piston in your braking system. The brake piston is housed within the brake caliper and is responsible for pushing the brake pads against the brake rotor, which creates the friction needed to slow or stop the vehicle. The hydraulic pressure generated by the master cylinder causes the brake fluid to move the piston. Over time, as brake pads wear down, the piston moves outward to compensate for the reduced pad thickness. To install new, thicker brake pads, you need to compress the piston back into the caliper.
There are two main types of brake pistons: single-piston calipers and multi-piston calipers. The process for compressing the piston is generally the same, though you may have more than one piston to compress in the case of multi-piston calipers.
Tools You’ll Need
To compress the brake piston, you’ll need a few basic tools. Here’s a list of items to have on hand:
- C-clamp or brake caliper tool: This is the main tool used to compress the piston back into the caliper.
- Socket set or wrench: Used to remove the brake caliper bolts.
- Brake fluid reservoir cap: Before compressing the piston, it’s a good idea to remove the cap of the brake fluid reservoir to prevent pressure buildup.
- Brake cleaner: Used to clean the caliper and piston before reassembly.
- Shop rags or towels: For wiping away excess brake fluid or debris.
- Brake pad spreader (optional): A specialized tool that works similarly to a C-clamp but is designed specifically for compressing brake pistons.
Step-by-Step Guide to Compressing a Brake Piston
Now that you’re equipped with the necessary tools, let’s walk through the step-by-step process of compressing the brake piston:
Step 1: Prepare Your Work Area
Before you start working on your brakes, ensure that the vehicle is parked on a flat, stable surface. Engage the parking brake and, if necessary, use wheel chocks to prevent the vehicle from rolling. It’s also a good idea to lift the vehicle with a jack and secure it with jack stands if you’re working on a front or rear-wheel brake system.
Once the car is secure, remove the wheel to expose the brake caliper and rotor. This step may require a tire iron or impact wrench, depending on how tightly the lug nuts are fastened.
Step 2: Remove the Brake Caliper
To access the brake piston, you need to remove the brake caliper. Use a socket set or wrench to remove the caliper bolts. Typically, there are two bolts—one at the top and one at the bottom of the caliper. Once these bolts are removed, gently lift the caliper off the brake rotor.
At this point, the brake caliper will still be connected to the brake line, so be careful not to let it hang freely. Use a bungee cord or some other support to suspend the caliper and avoid putting stress on the brake line.
Step 3: Remove the Brake Pads
With the caliper off, you should now see the brake pads. Slide the old pads out of the caliper bracket. If the pads are stuck, a flathead screwdriver may help you pry them loose. Removing the old pads will create more space for you to work when compressing the piston.
Step 4: Check the Brake Fluid Reservoir
Before compressing the brake piston, it’s important to check the brake fluid reservoir under the hood. When you compress the piston, brake fluid will be pushed back into the reservoir. To avoid overflowing or creating excessive pressure, remove the cap from the brake fluid reservoir. This will allow fluid to move freely as you compress the piston.
Step 5: Compress the Brake Piston
Now you’re ready to compress the brake piston. Place the C-clamp or brake caliper tool over the piston and the back of the caliper. Slowly tighten the C-clamp or tool to push the piston back into the caliper. As you tighten, the piston will retract, creating space for the new brake pads.
For multi-piston calipers, you may need to compress one piston at a time, or you may be able to do both simultaneously, depending on the tool you’re using.
If you’re working on a rear brake system with an integrated parking brake, you may need to use a brake caliper tool designed to rotate the piston while compressing it. This rotation is necessary because the piston is threaded and needs to be screwed back into place.
Step 6: Inspect the Piston and Caliper
After compressing the piston, inspect the caliper and piston for any signs of wear or damage. If the piston is difficult to compress, there may be corrosion or debris causing it to stick. Use brake cleaner to clean the area around the piston and caliper. If the piston does not compress or appears damaged, it may need to be replaced.
Step 7: Reassemble the Brake System
Once the piston is fully compressed and the caliper is clean, slide the new brake pads into place. Then, reposition the caliper over the brake rotor and secure it with the caliper bolts. Tighten the bolts to the manufacturer’s recommended torque specifications.
Before you reattach the wheel, double-check your work to ensure everything is correctly installed.
Step 8: Test the Brakes
After reassembling the brakes and reattaching the wheel, pump the brake pedal a few times before driving. This step is crucial because it ensures that the brake piston extends to its proper position and that the new pads make contact with the rotor. The brake pedal should feel firm after a few pumps. If the pedal feels soft or spongy, there may be air in the brake lines, and you may need to bleed the brakes.
Finally, replace the cap on the brake fluid reservoir, check the fluid level, and add more fluid if necessary.
Additional Tips and Considerations
- Use the Right Tools: While a C-clamp can get the job done, using a specialized brake caliper tool will make the process easier and reduce the risk of damaging the piston or caliper.
- Check the Brake Fluid Level: After compressing the piston, always check the brake fluid level in the reservoir. If it’s too high, remove a small amount of fluid with a turkey baster or similar tool.
- Be Cautious with Rear Brakes: Rear brake calipers with integrated parking brakes may require a special tool to rotate and compress the piston simultaneously. Always refer to your vehicle’s manual to ensure you’re following the correct procedure.

Conclusion
Compressing a brake piston is an essential part of maintaining your vehicle’s braking system, especially when changing brake pads. With the right tools and careful attention, the process is straightforward and can be done at home. However, if you’re unsure or uncomfortable performing this task, it’s always best to seek help from a professional mechanic to ensure your safety.